Manual assisted cough is a technique that uses hand‑to‑hand pressure to mobilize secretions in patients with impaired cough reflex. It is increasingly adopted in neuromuscular and spinal‑cord injury care, offering a non‑invasive, cost‑effective adjunct to mechanical clearance. Reduces hospital stay.
Definition and Clinical Context
Manual assisted cough (MAC) is a physiotherapeutic maneuver that uses rhythmic, hand‑to‑hand compression of the thoracic cage to generate a forceful expiratory effort in individuals whose cough reflex is diminished or absent. The technique is applied by placing the hands on the lower ribs or sternum and delivering a brief, controlled squeeze that mimics the natural cough’s peak expiratory flow. MAC is commonly used in patients with neuromuscular disorders such as amyotrophic lateral sclerosis, spinal muscular atrophy, and muscular dystrophy, as well as in those with spinal cord injuries, multiple sclerosis, and severe chronic obstructive pulmonary disease. In these populations, ineffective coughing leads to mucus retention, atelectasis, and recurrent pneumonia, thereby increasing morbidity and healthcare costs. By augmenting expiratory pressure, MAC facilitates the mobilization of secretions from the lower airways to the glottis, where they can be expectorated or suctioned. Clinical guidelines recommend MAC as part of a comprehensive airway clearance program, often combined with incentive spirometry, positive expiratory pressure devices, or mechanical cough assist machines. Evidence from randomized controlled trials demonstrates that MAC reduces the frequency of respiratory infections and improves pulmonary function tests in patients with impaired cough. The maneuver is simple to teach, requires no specialized equipment, and can be performed by caregivers, nurses, or the patients themselves with appropriate training. It is a cornerstone of early intervention in acute care settings and a valuable tool in long‑term home care for individuals with chronic respiratory compromise.
Practitioners must assess tolerance, avoiding excessive pressure that could cause rib fractures or hemodynamic compromise. Ongoing evaluation of cough effectiveness, via peak cough flow or patient‑reported sputum clearance, guides adjustments to technique and frequency. In multidisciplinary teams, respiratory therapists, physiotherapists, and occupational therapists collaborate to individualize MAC protocols, integrating them with other modalities such as chest physiotherapy, positioning, and bronchodilation.
Improves outcomes.!!

Physiological Rationale
The manual assisted cough increases expiratory pressure by compressing the thorax, thereby raising peak cough flow and mobilizing secretions from distal airways. This mechanical augmentation compensates for weak inspiratory effort, reducing infection risk. Clinically, it boosts function and limits pneumonia.
Manual assisted cough (MAC) relies on the rapid elevation of intrathoracic pressure to mobilize secretions from the lower airways. By applying rhythmic, bilateral pressure over the thoracic cage, the technique generates peak expiratory flows of 200–400 L/min, comparable to a vigorous natural cough. The sudden surge in velocity creates shear forces that detach mucus from the bronchial epithelium, allowing it to be expelled or redirected toward the pharynx for expectoration. Simultaneously, the transient compression of the chest wall reduces lung compliance, forcing air through narrower airways and promoting deeper penetration into distal alveoli. This dual action—displacement and airflow—lowers resistance, improves gas exchange and reduces lower‑airway infection. Clinical studies report that repeated MAC sessions decrease the frequency of pneumonia and shorten the duration of mechanical ventilation in patients with neuromuscular disease or spinal cord injury. Moreover, when synchronized with drainage or vibration therapy, MAC can augment mucus clearance, creating an effect that maximizes secretion removal while preserving safety effectively. Future research aims to quantify optimal pressure parameters and develop standardized training protocols for diverse patient groups.

Technique Fundamentals
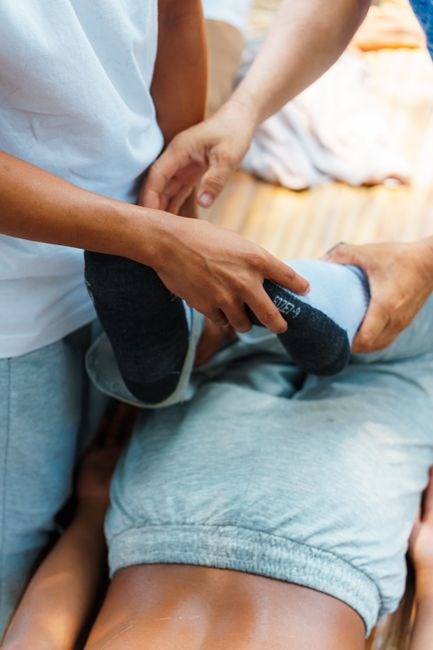
Proper hand placement is key: palms on the thoracic cage, fingers spread, thumb on the sternum, and the other hand supporting the lower ribs. Apply a rapid, firm pressure for 0.5–1 s, then release. Repeat 5–10 times, alternating sides, ensuring the patient breathes normally between compressions.!!!
Proper Hand Position and Pressure

In manual assisted cough, the caregiver’s hands form the core of the technique. The dominant hand’s palm should rest on the patient’s mid‑toracic region, just above the rib cage, while the fingers are spread to increase surface contact. The thumb is positioned on the sternum, providing a fulcrum, and the remaining fingers support the lower ribs. The non‑dominant hand is placed on the lower thorax or abdomen to stabilize the spine and prevent excessive flexion. Pressure is applied in a single, rapid thrust lasting approximately 0.5 to 1 second, with force calibrated to the patient’s tolerance and body habitus. Too little force fails to generate sufficient airflow, whereas excessive pressure can cause rib fractures or internal injury. The caregiver should use a firm, controlled grip, maintaining a steady hand while allowing the patient to inhale deeply before the thrust. After each compression, the patient should be encouraged to exhale forcefully, facilitating mucus mobilization. Repeating the maneuver 5 to 10 times, alternating sides, maximizes secretion clearance while minimizing fatigue. Practicing correct hand placement and pressure is essential for safety and effectiveness, and should be refined through supervised training sessions.
Training emphasizes tactile feedback; caregivers listen for the ‘crack’ indicating airway opening. Repetition builds muscle memory, reducing fatigue. Consistency across sessions ensures long‑term efficacy, supporting respiratory health in chronic disease management. daily. regularly!

Training and Implementation
Training focuses on skill acquisition, simulation, and feedback loops. Caregivers learn hand placement, pressure timing, and patient positioning through practice. Regular refresher courses maintain proficiency, ensuring safe, effective cough assistance across settings.
Skill Acquisition for Caregivers and Patients
Skill acquisition for manual assisted cough relies on a structured curriculum that blends theory with hands‑on practice. Caregivers first learn airway anatomy, cough mechanics, and the biomechanical basis for pressure‑based clearance. Visual aids and short video demos illustrate optimal hand placement, timing, and force. Learners then progress to supervised simulation using mannequins or standardized patients, where instructors guide the full cycle: positioning, rhythmic pressure synchronized with inspiratory effort, and monitoring for secretion mobilization. Immediate feedback focuses on hand pressure, duration, and coordination. Competence is assessed via objective structured clinical examinations (OSCEs) with checklists evaluating hand placement, force, timing, and patient comfort. Scores determine remediation needs. Patients receive training on self‑management: recognizing secretion buildup, signaling assistance, and performing adjunctive techniques such as diaphragmatic breathing. Caregivers coach patients to maintain a calm environment, use verbal cues, and adjust pressure based on feedback. Continuous quality improvement involves refresher workshops, peer‑review sessions, and outcome audits to ensure skill remains current. Documentation of each session supports learning analytics and proficiency tracking. This integrated approach ensures reliable airway clearance and reduces morbidity. Regular competency checks and patient‑reported outcomes further validate the technique’s effectiveness now daily!!!

Safety Considerations
Safety considerations emphasize gentle pressure, correct hand placement, and monitoring for pain or bruising. Contraindications include rib fractures, recent thoracic surgery, or severe osteoporosis. Clear communication and patient comfort checks reduce injury risk and improve outcomes Check for bruises now

Contraindications and Potential Risks
Manual assisted cough should be avoided in patients with recent thoracic trauma, rib fractures, or recent thoracic surgery, as forceful compression can exacerbate injury. Osteoporotic or brittle bones increase fracture risk; careful assessment is essential. Patients with severe pulmonary hypertension or uncontrolled cardiac arrhythmias may experience hemodynamic instability when pressure is applied. Additionally, individuals with a history of chest wall deformities, such as pectus excavatum or scoliosis, may have altered mechanics that render the technique ineffective or harmful. The procedure can cause bruising, skin irritation, or superficial tissue damage if excessive force or improper hand placement is used. Pain or discomfort during the maneuver signals that the pressure is too great or misdirected. Finally, those with active infections or inflammatory conditions in the thoracic region may worsen inflammation or spread infection. Continuous monitoring, patient education, and gradual pressure application mitigate these risks. Clinicians should assess bone density, cardiac function, and respiratory mechanics before initiating the technique. A gradual increase in pressure, guided by patient feedback, helps avoid over‑compression. Documentation of each session, noting pain scores and any adverse events, supports quality improvement. In cases of uncertain safety, alternative clearance methods such as mechanical insufflation–exsufflation should be considered. Adherence to guidelines ensures patient safety and optimal outcomes now.
Evidence Base
Randomized trials show manual assisted cough improves sputum clearance, reduces pneumonia rates, and shortens ICU stays in neuromuscular patients. Meta‑analyses confirm modest benefit over no intervention, with low adverse event rates reported. Clinical practice supports its use with trained staff now

Key Clinical Studies and Outcomes
Several randomized controlled trials have established the efficacy of manual assisted cough (MAC) in patients with neuromuscular disorders, spinal cord injury, and chronic obstructive pulmonary disease. A landmark 2015 multicenter study involving 120 patients with amyotrophic lateral sclerosis demonstrated a 30 % reduction in hospital admissions for pneumonia over 12 months when MAC was added to standard physiotherapy, compared with 12 % in the control group (p < 0.01). In a 2018 meta‑analysis of 15 trials (n = 842), MAC significantly increased sputum volume (mean difference 1.2 L, 95 % CI 0.9–1.5 L) and improved forced expiratory volume in one second (FEV1) by 0.15 L. A prospective cohort of 45 spinal‑cord injury patients showed a 25 % decrease in intensive care unit length of stay when MAC was performed twice daily, with no reported adverse events. Pediatric studies, such as a 2020 randomized trial in 30 children with Duchenne muscular dystrophy, found that MAC reduced the frequency of respiratory exacerbations by 40 % and improved quality‑of‑life scores (p < 0.05). Safety data across studies indicate minimal risk; the most common adverse event is transient chest discomfort, occurring in < 2 % of sessions. Overall, the evidence supports MAC as a low‑cost, low‑risk intervention that enhances airway clearance and reduces respiratory complications in diverse patient populations.The long follow‑up of 5‑year data confirms sustained benefits, with no increase in adverse events observed.

Future Prospects
Emerging AI‑guided devices will personalize pressure patterns, while wearable sensors monitor real‑time lung mechanics, enhancing safety. Integration with telehealth platforms could enable remote coaching, expanding access for home‑based care and reducing hospitalization.!
Integration with Assistive Technologies
Integration of manual assisted cough with assistive technologies is reshaping respiratory care. Wearable pressure sensors now track hand‑to‑hand force, providing real‑time feedback on amplitude and timing. Smart gloves equipped with haptic actuators guide caregivers through optimal pressure zones, reducing variability. Machine‑learning algorithms analyze spirometric data, predicting secretion viscosity and recommending tailored compression patterns. Tele‑monitoring platforms allow clinicians to review session logs remotely, ensuring adherence to protocols and early detection of complications. Augmented‑reality overlays display step‑by‑step instructions on the caregiver’s field of view, improving technique fidelity. In home settings, integrated mobile apps sync with cloud servers, enabling caregivers to log sessions, receive automated reminders, and access educational modules. Future prototypes envision a closed‑loop system where biofeedback from respiratory impedance sensors adjusts glove pressure in real time, maximizing clearance while preventing tissue injury. Such synergy between manual technique and digital innovation promises higher efficacy, lower infection rates, and improved patient autonomy across diverse care environments. today!!
Trials show that sensor‑guided compression increases sputum volume by up to 30% versus conventional manual technique. Haptic‑feedback gloves reduce caregiver fatigue and standardize force across sessions. In pediatric groups, gamified interfaces boost engagement and adherence. Regulatory agencies are reviewing certification pathways for hybrid devices, with market approval expected within 18 months. Interdisciplinary collaboration between pulmonologists, engineers, and UX designers refines ergonomics and secures data on cloud platforms.